

New pipe planters create a focal point in front garden

Me and my pipe planters! I have three new pipe planters in my front garden, which I installed last fall (pre-house painting) but never got around to sharing, thanks to all the New England-down-to-Virginia travel posts I slathered on the blog. (My fellow heat-wave sufferers, click the link and follow the links at the bottom of each post to enjoy photos from a much cooler place and time.)
Anyway, better late than never! Today I’ll share about the process of getting these wonderful rusty pipes set up in my garden, and why.
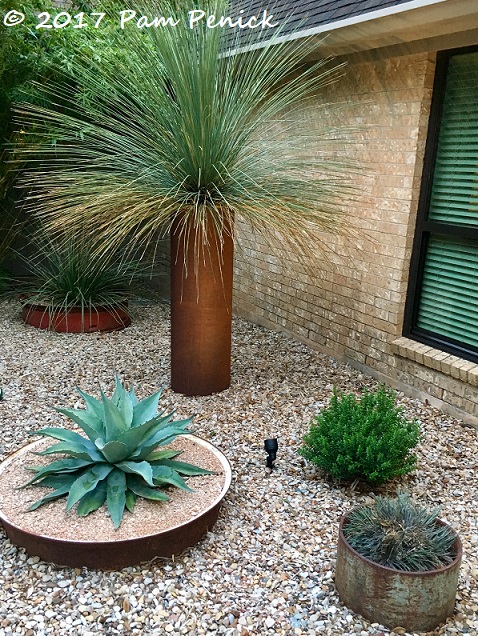
Regular readers know I love a rusty pipe or two or three. I started with the tall steel pipe that holds a Mexican grass tree (Dasylirion longissimum) and added a short pipe with a ‘Frazzle Dazzle’ dyckia, plus two rusty tractor rims planted with a whale’s tongue agave and a red yucca. Bulletproof for heat but not for Snowpocalypse, alas. I lost the grass tree and have since replaced it, and part of the dyckia. Still, the pipes look good no matter what Mother Nature throws at them, and they elevate dry-loving plants for drainage and display.
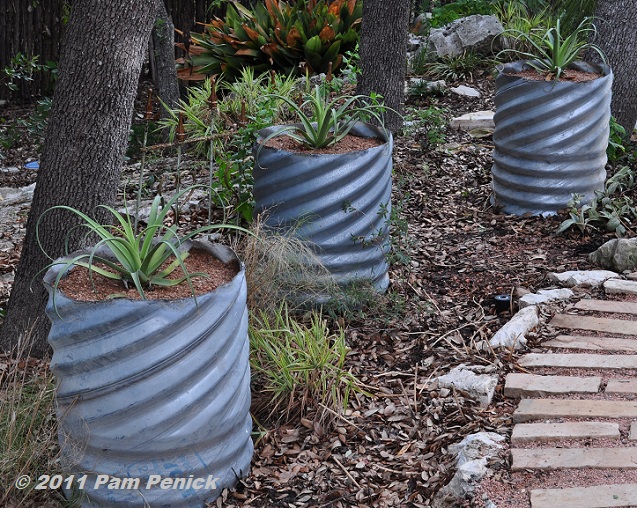
I use culvert pipe remnants in the back garden. I like the way they show off dry-loving plants that would otherwise get lost or soggy if planted in the ground, like this trio of squid agaves (A. bracteosa).
All this is to say, pipe planters and I go way back. I got the bug again last fall when I visited two new-to-me Austin gardens. John Ignacio’s front garden, pictured above, uses cut pieces of square steel pipe planted with blue twister sotol (Dasylirion berlandieri) to screen the street. So eye-catching, especially with those strappy, powder-blue leaves.
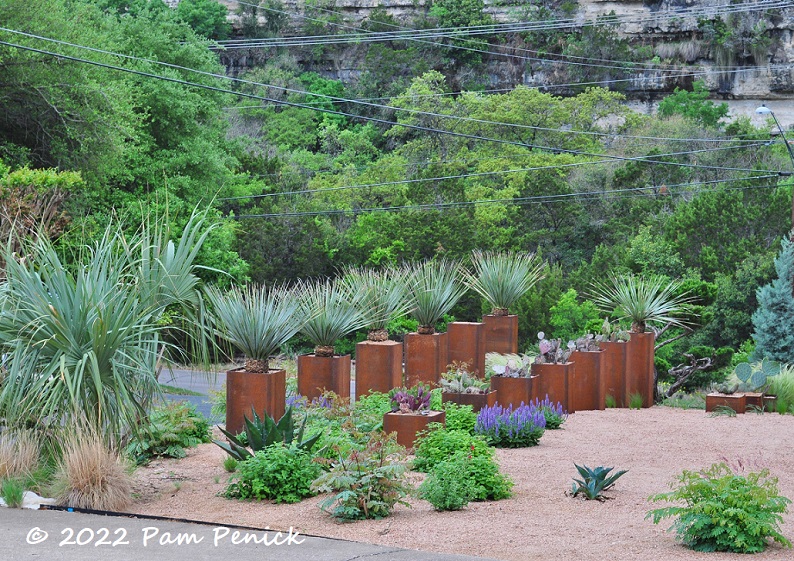
I saw more square-pipe goodness in Coleson Bruce’s front garden (which he and John worked on together). A double line of pipe pieces, cut carefully to Coleson’s specifications, display sotol and opuntia to screen a busy intersection and make a striking view from within the garden.
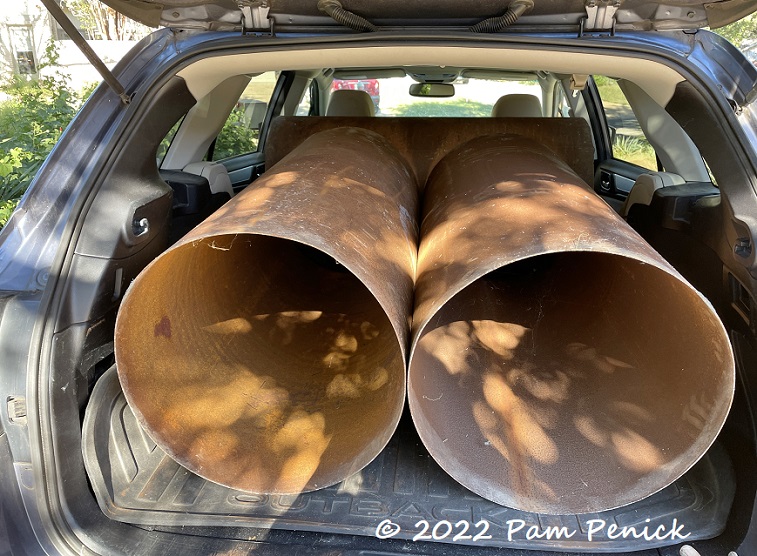
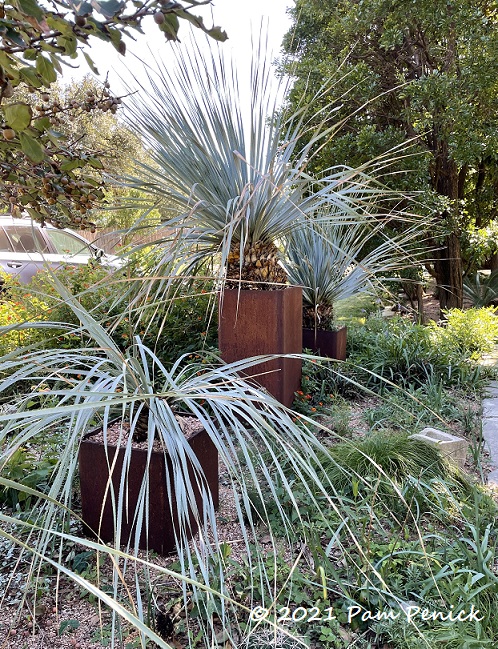
I visited John’s and Coleson’s gardens in October. By November I was scrolling through Craigslist and Facebook Marketplace daily, looking for steel pipe pieces. Steel is pricey, especially thick pieces, but I soon found a listing in San Antonio for inexpensive steel pipe that could be turned into smokers (like this). It’s not the thickest gauge, but I decided it would do fine for planting and hopefully not rust through anytime soon. And my handy Outback was able to hold three 4-to-5-ft pipes for the trip back to Austin.
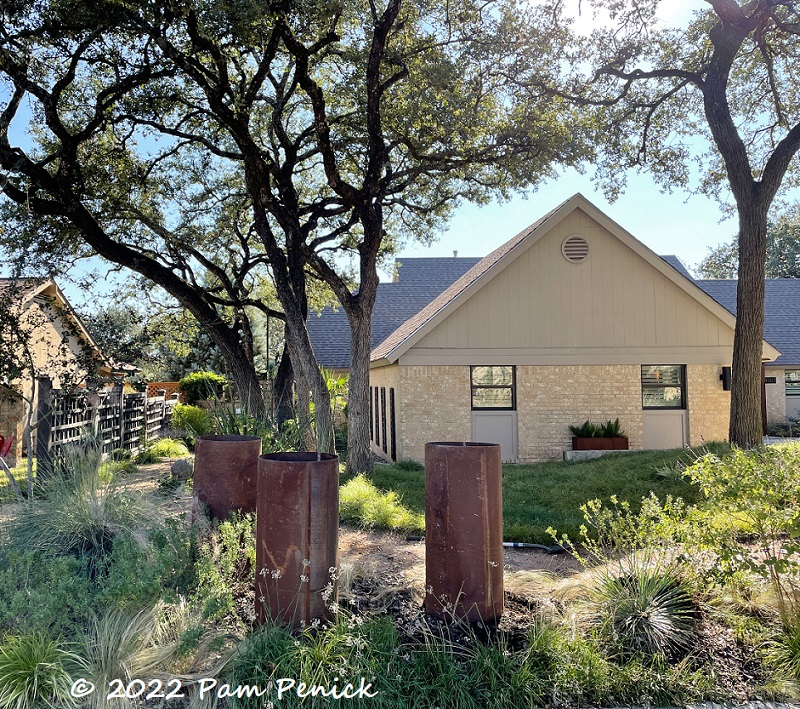
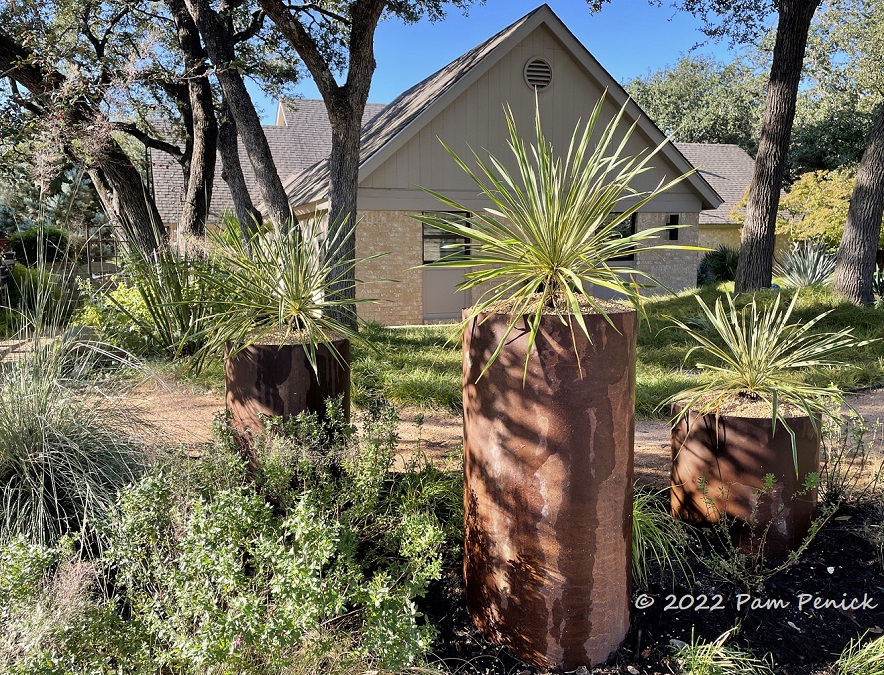
I wanted them for the front-garden’s deep hellstrip bed, where the plants felt kind of two-dimensional, especially from winter through midsummer, when a ‘Vertigo’ grass would finally attain some height. I’m challenged by voracious deer and dry shade, and I tend to rely on grassy texture and herbal-scented foliage — whatever the deer won’t eat and that can live in dry shade without extra watering. But everything seemed to top out at 2 to 3 feet except for a possumhaw holly at the corner. I needed a focal point with some height, but not right in front of the house. At the bend in the path, I stood the three pipes to experiment with placement.
Because the pipes would be viewed from all sides, it was difficult to decide how far apart to triangulate them, and how tall each pipe should be. John was kind enough to come by and give his opinion, and I asked my designer friend Diana too. And a friendly neighbor. Basically anyone who walked or drove by. I wanted staggered heights and planned to bury them at different depths to get that look. But the shortest one would need to be buried several feet, and so when my friend Lori offered to cut one for me, I jumped at her offer.
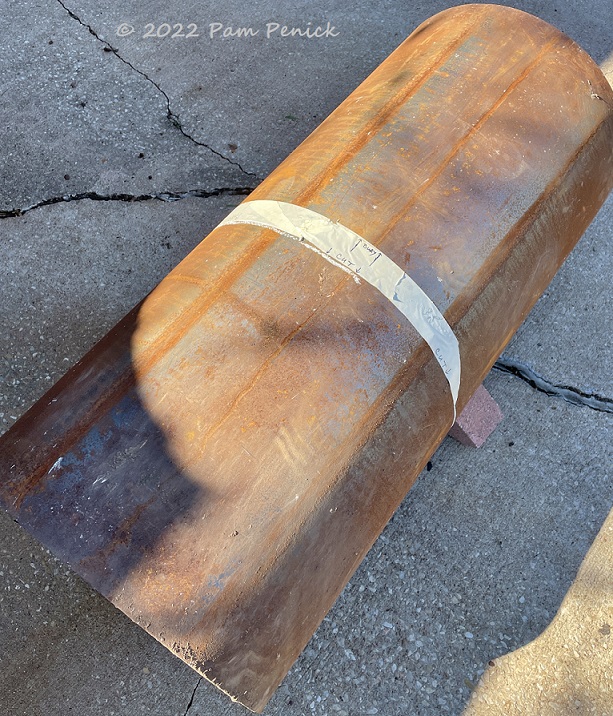
When I was satisfied with the layout, I used masking tape to mark how deep each one should be buried (for stability), and where to make the cut on the shortest one.
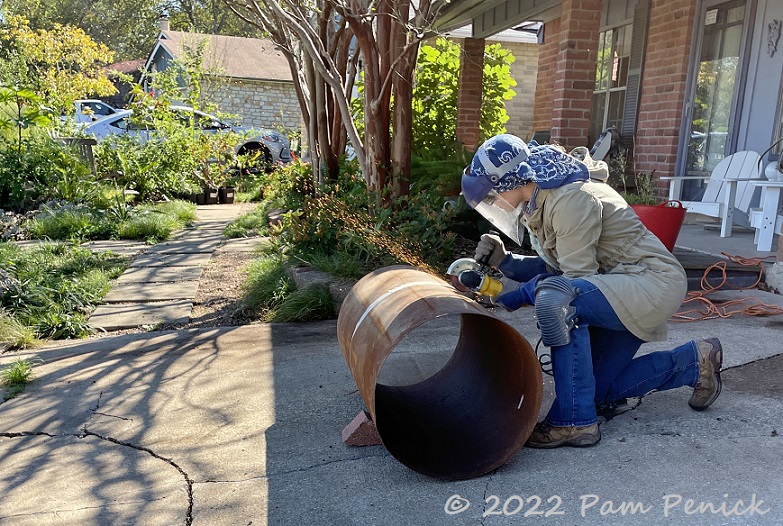
I drove over to Lori’s house with the pipe, and like the badass she is, she whipped out her welder’s mask and gloves, donned a jacket and bandana to protect against sparks, and used her angle grinder to start cutting.
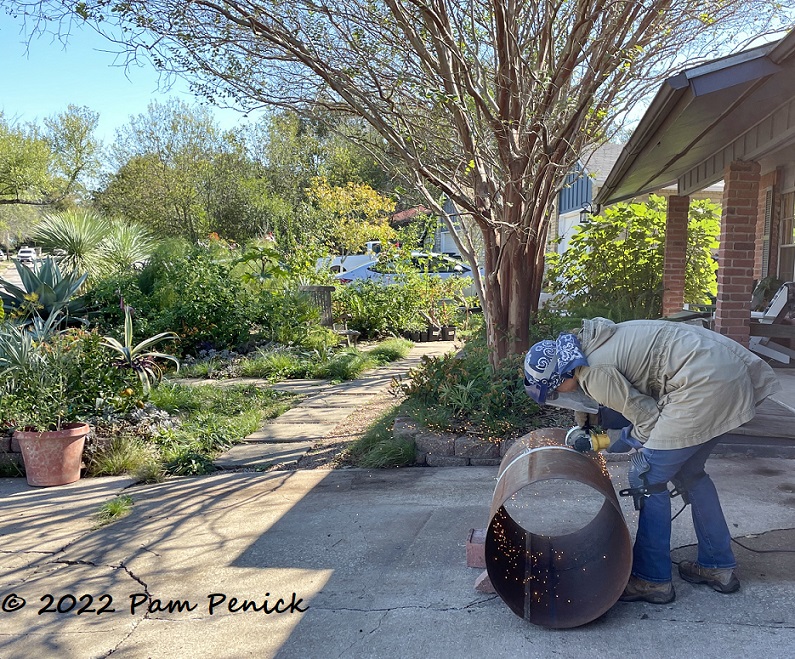
And cutting and cutting and cutting. It took longer than we’d both expected, but she prevailed. I gave her one of the cut pieces and cash for a new grinder blade and headed home with my custom-cut pipe. (Thanks, Lori!)
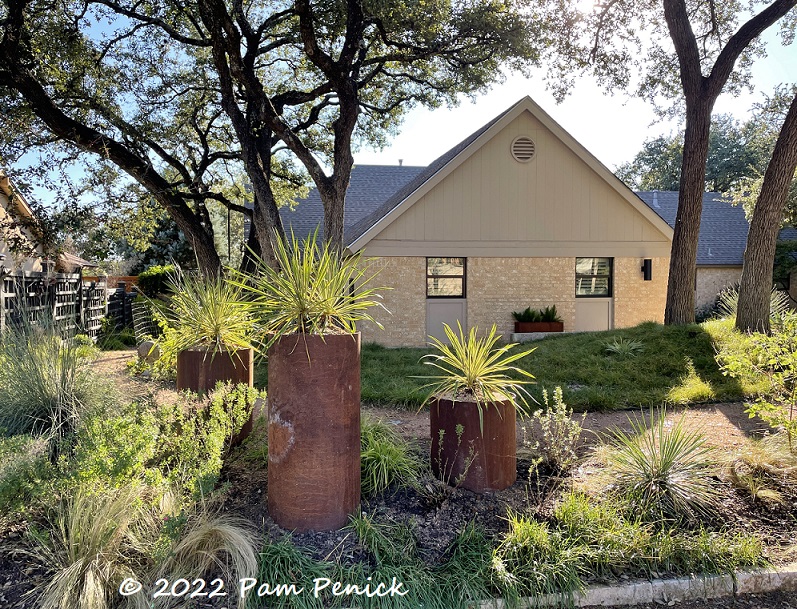
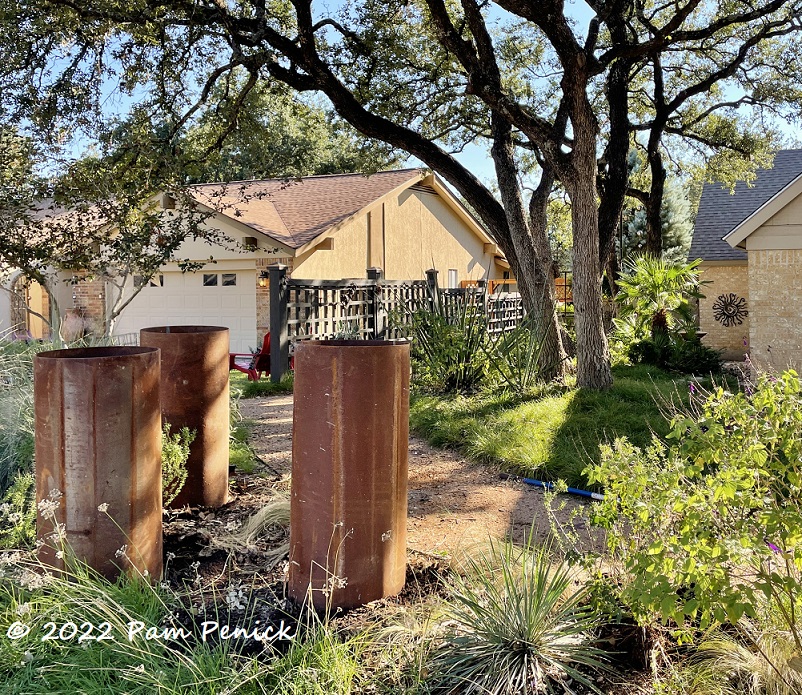
And here they are, all planted up. Easy, right? No. In my younger days I would have done the installation myself, but I’m older and wiser now. I hired a helper to dig out the holes and help me place the pipes, level them, and fill them with soil. I used decomposed granite to level them: tamping several inches of DG in each hole and then placing the pipes, checking them with a level, and adding more tamped DG until each pipe stood straight and level.
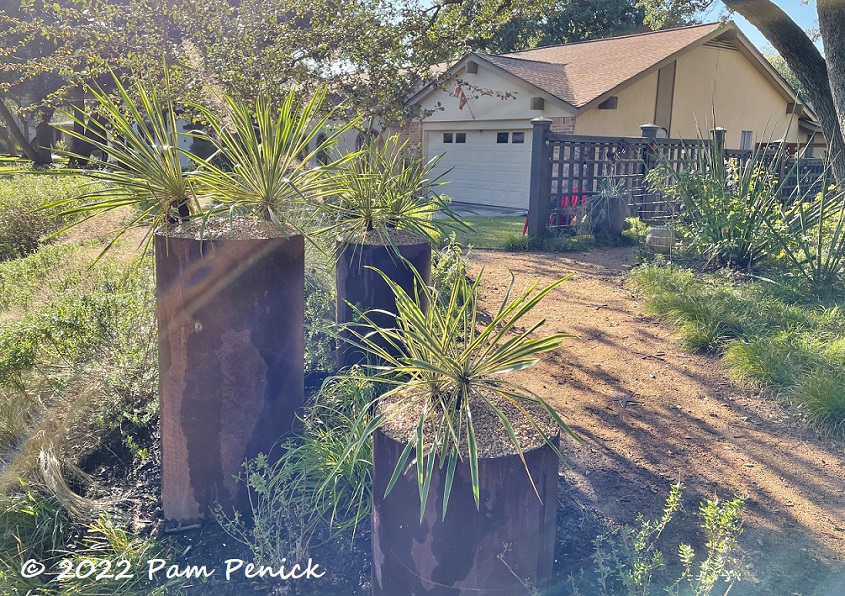
I dumped fist-sized rocks (purchased along with the DG, plus others dug out of the ground) into the taller pipes to take up some of the space and then filled them with soil. Actually, I took a soil shortcut that I soon regretted. I used straight decomposed granite to fill the pipes, thinking the ‘Bright Edge’ yuccas I planned to plant would be fine with that gritty medium. Normally I use a mixture of half potting mix and half DG for my xeric planters, but not this time. My helper was there, I didn’t have potting soil, and I had plenty of DG — so I went for it. I planted the yuccas high, knowing soil in a tall container compacts quite a bit over time, and then I top-dressed them with pea gravel. Beautiful!
The straight DG was a mistake. It compacted densely, I think, and the yuccas soon showed signs of struggle. Their leaves grew thin over the winter, and many leaves died and had to be removed. I have no pics of this stage because it was too depressing. By spring the yuccas were shadows of themselves, and I contemplated pulling them out and replacing with new plants.

But when I priced new yuccas at nurseries all over Austin, they were being sold at $50 each — and those weren’t even very big. We all know plant prices have soared this year, but I just couldn’t do it.
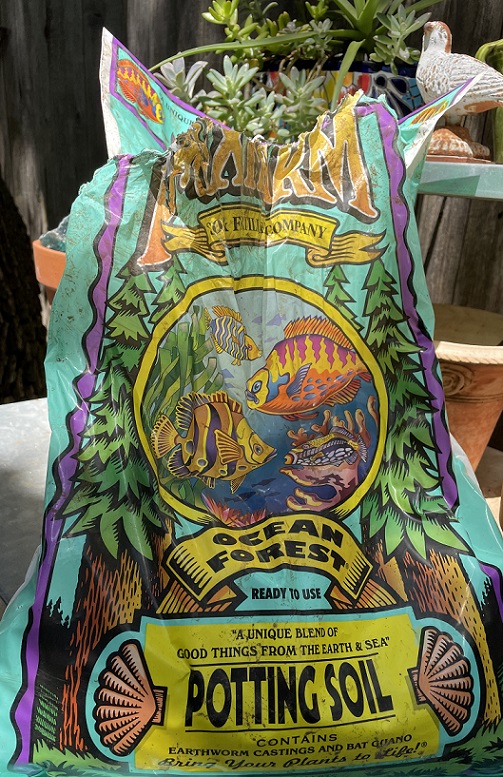
I came home instead with FoxFarm Ocean Forest potting soil from Barton Springs Nursery, on the recommendation of a young salesperson to whom I told my tale of woe. I followed instructions to spread an inch of this stuff atop the potting soil, after first scraping off the pea gravel mulch, which I replaced afterward.
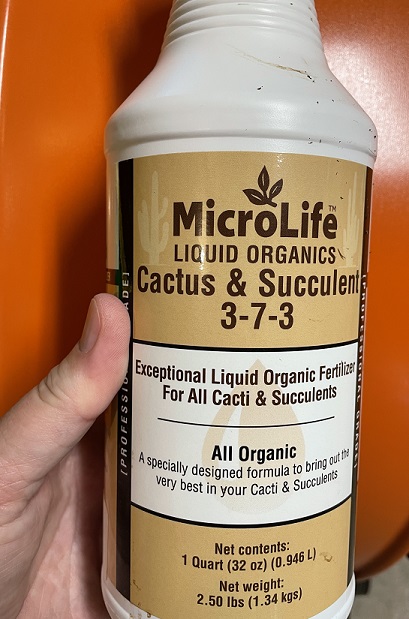
And a visit to Garden Seventeen, where I was still sharing my yucca sob story, convinced me to try MicroLife Liquid Organics Cactus & Succulent fertilizer. I stirred it into water as directed and fertilized the yuccas with it, as well as my other small succulent containers while I was at it.
A month later new growth was sprouting from the roots, and by two months the yuccas were almost full size again. These are still images from last fall — when I was planning to blog about them, but then got sidetracked. Today they are not quite this full, but they should be soon. I’ve often pooh-poohed fertilizers, thinking plants that like lean soil don’t really need it, but now I’m sold. Apparently you can have soil that’s too lean. Especially if you don’t plant in soil but in straight DG.
Hey, I make the mistakes so you don’t have to!
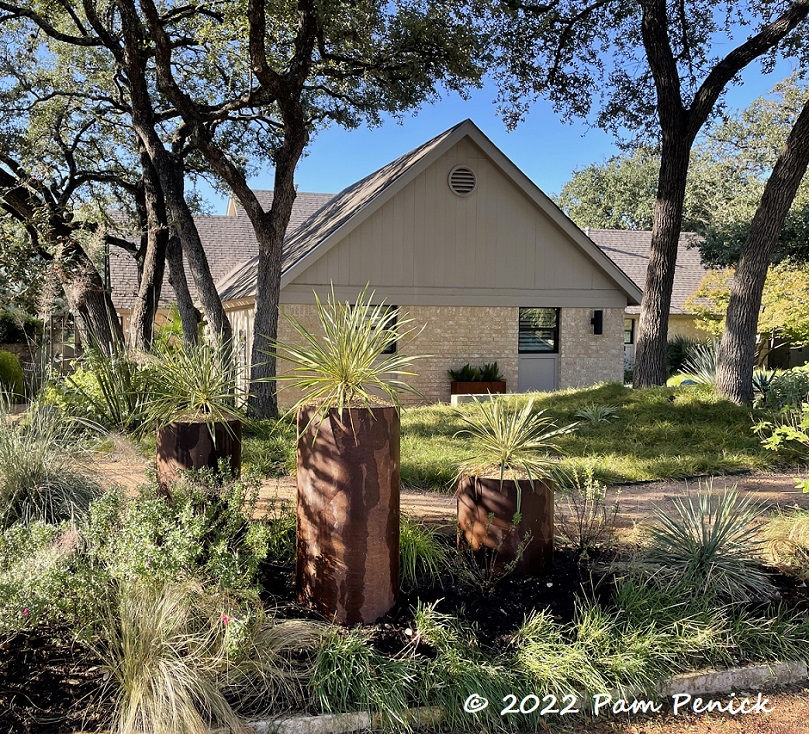
I’m enjoying my new pipe planters again, and the deer have only eaten half of one of the yuccas (they find new growth tasty, but established yuccas are usually fine), so I call that a win!
__________________________
Digging Deeper
Come learn about gardening and design at Garden Spark! I organize in-person talks by inspiring designers, landscape architects, authors, and gardeners a few times a year in Austin. These are limited-attendance events that sell out quickly, so join the Garden Spark email list to be notified in advance; simply click this link and ask to be added. Season 8 kicks off in fall 2024. Stay tuned for more info!
All material © 2025 by Pam Penick for Digging. Unauthorized reproduction prohibited.
They are super cool and perfect where you placed them.
Thanks, Gail. I’m enjoying them!
I haven’t been back to my source for pipes again because I fear the lack of self-control in such a small garden. And believe it or not, it is a very small club of pipe planter aficionados we belong to! My family is kind about my salvage habit, if not true fans. But I think your new trio is smashing and really works in that grassy, shady area. And about fertilizer…not something I think about or use much, but on the rainy coast it occurs to me there must be a lot of the leaching going on with the constant rain, so I’ve been adding chicken compost to a few plants. Turns out, they’re very appreciative!
Whaaaaat, a small club of pipe planter aficionados?? I can’t believe it. Although now that you mention it, looking around my ‘hood, I’m not seeing any others, haha. I’m glad to be in your very good company on this, Denise. And yay for chicken poop!
Well done, Pam (even with the hiccups). I saw that Ocean Forest potting soil at my local garden center last week for the first time and wondered whether warranted a try. It’s good to hear that you’ve had a positive experience. I use a liquid cactus/succulent feed periodically but perhaps not as often as I should.
I threw everything I could find at those yuccas, Kris. Not sure if it was one of the fertilizers vs. another, but whatever it was, it worked. And saved me a bundle on new plants — yay!
I do love those pipes! Check out chimney flue liners. I am guessing on name but they are the terra cotta color and about an inch thick on sides. Mine are about 3 feet tall, two standing and one on side to sit on while watering. They are heavy so no digging required.
Chimney flue liners — same concept, yes! I’ve seen them used to good effect.
Did you say how heavy these were, or did I miss that?
I didn’t. I could wrangle a pipe solo with difficulty, or with relative ease with a helper.
These rusty pipes look handsome situated and planted as you have done. Nothing like team work to pull together a living work of art.
Thanks, Lisa, and I agree.