

Hillside gravel and timber path–done!
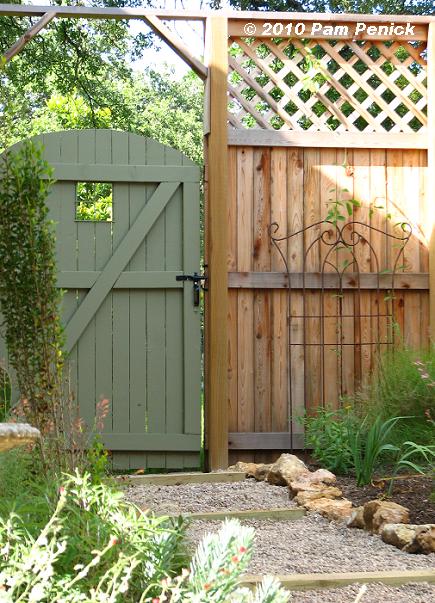
What joy in the completion of a long-delayed project! I’m not speaking of the narrow side garden itself, which is quickly filling in under the blazing sun’s heat, but the gravel-and-timber pathway that leads you through the sloping garden.
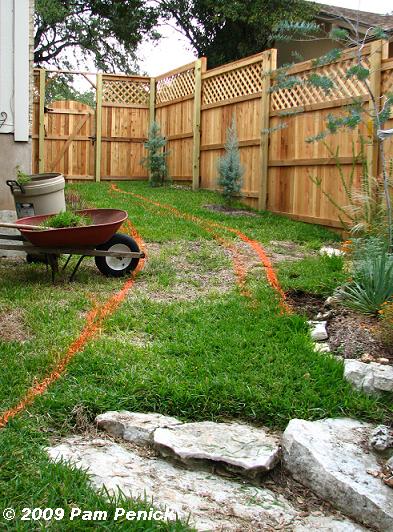
I rarely pass up a chance to show before-and-after pictures, finding them inspiring myself. So here’s a before of a typical side-yard lawn, looking up-slope from the back yard toward the front. We’d already installed a new fence at this point, pushing the gate forward about 25 feet and therefore extending the deer-proof back garden. I had sprayed out the lines of a pathway through the space and just started digging out new beds on either side of the path.
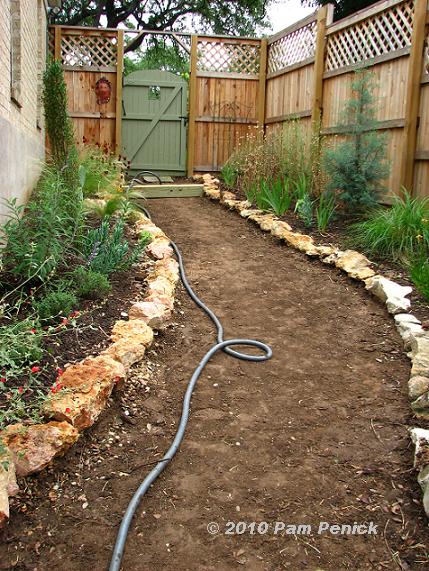
Eight months later the new garden is growing, and it’s time (way past, actually) for the path to go in. This time I hired out the grass removal, making sure they left the edging stones I’d hauled over from the surplus at Austin Memorial Cemetery (free for the taking). I tried out a 6×6 treated timber post for size up by the gate but realized it was too tall for my intended sloping steps.
I ended up using 4×4 treated posts, which I cut to fit with a circular saw. I drilled a half-inch hole near the ends of each cut post and pounded in an 18-inch length of three-eighth-inch rebar to secure the posts to the ground.
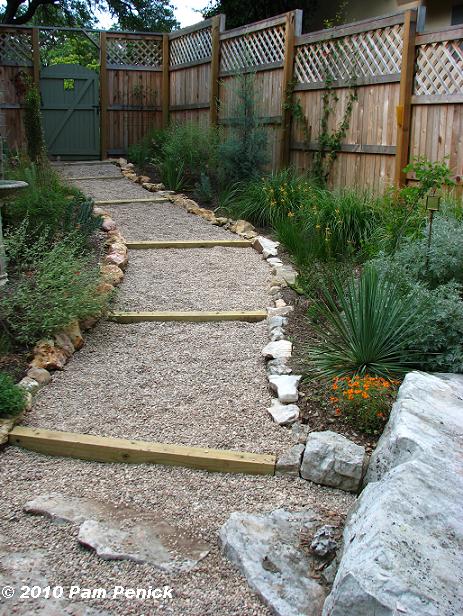
A trip to Whittlesey Landscape Supplies enabled me to pick out a washed pea gravel in buff shades (not glaring white), and I found a landscaper there who was willing to handle the small job (for him, not me!) of picking up and delivering one and a half cubic yards of pea gravel, shoveling it in a wheelbarrow, rolling it 50 feet downhill, and spreading it in the spaces between the treated posts.
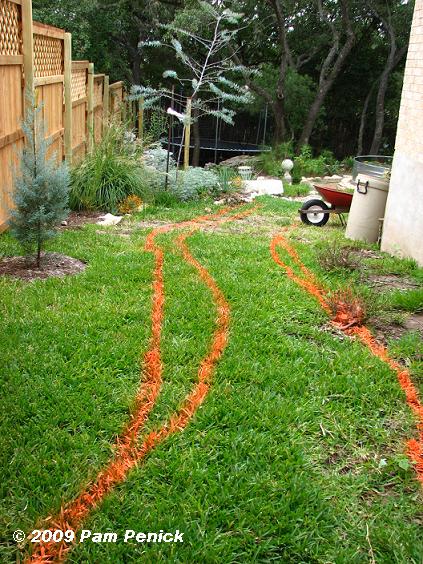
And here’s the same sequence of before-and-afters, looking down-slope: Pathway defined and new beds being dug out. That purple-leaf acacia tree, by the way, didn’t survive our hard freezes last winter, and I’ve replaced it with an Anacacho orchid tree.
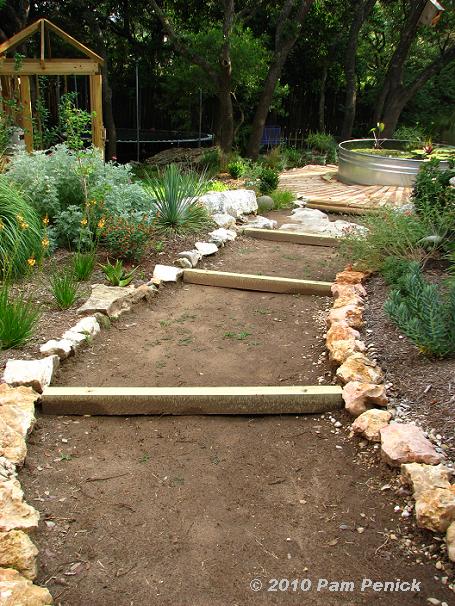
After: The grassy path has been dug out, and treated timbers are secured to the ground approximately 6 feet apart.
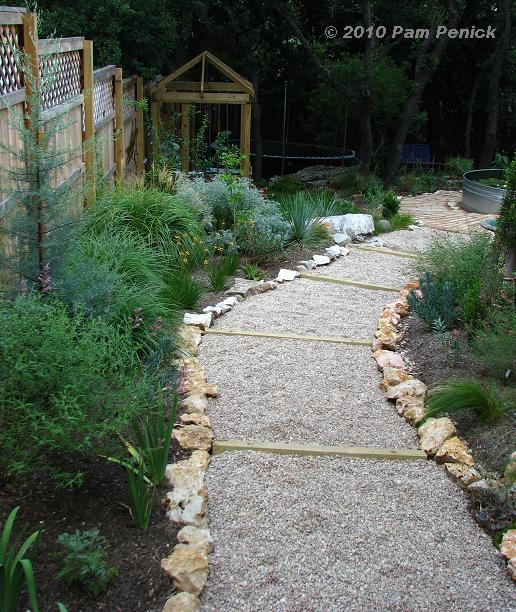
Done! Several inches of pea gravel have filled in the “steps” and given the path a neat, finished appearance. This path is not heavily used, but I am curious to see how the gravel holds up along the slope after some foot traffic. Update Spring 2012: The pea gravel “traveled” too much on this path, so I switched it out with crushed limestone gravel, which packs together and makes a firmer surface.
On a separate subject, a regular reader has told me that she’s been having trouble leaving a comment on my site for some time. I have had no other indication of trouble with my comment field, so I’d appreciate it if anyone else who’s been having difficulty could let me know what’s happening. Thanks!
All material © 2006-2010 by Pam Penick for Digging. Unauthorized reproduction prohibited.
Testing…testing?
The path looks wonderful, Pam – you came up with something that enhances the slope and connects it to the whole back yard. It’s somewhere between a finished path and the kind of trails you see in state parks so every stroll down from gate to sunburst will be a little vacation!
Annie at the Transplantable Rose
Pam,
It looks fantastic! I’m a big fan of before and after pics too. 🙂
Wow! Looks awesome!!!!
Love it! Isn’t it nice when a project is complete?
I’m wondering how some recycled glass sand might look instead of the pea gravel.
I, too, am a huge before & after fan. I love your side garden! Very, very charming!
That looks terrific! I have been thinking of doing something similar in my side yard – and it’s always good to see beautiful after photos!
I like that order of business — plants first, then the path, because wow, does it look gorgeous filled in now. Love the view down to the sunburst.
Wow Pam. How fun to see the process. I can’t believe you’ve been able to establish such a wonderful looking garden in so short a time. Looks great!
This area looks so welcoming now with the finished path. I like the before and after pictures too. I can see how much work you have done. Great!
Before, during and after photos I love as well..you have very good ideas! This looks great Pam.
Pam, It looks great~The before and after photos help me see the process but I find it generalizes to other situations. Maybe we can learn to ‘see’ better! gail
The path looks lovely. I love the combination of materials, but the edging stones really make it. Beautiful job!
Hi ya Pam…I am still having issues commenting. Although of course since I’ve said that this one will show up right? (hope so)…anyway…Job well done! And I too love before and after shots. I bet your gravel stands up to the traffic well. Ours sure has.
Gosh, it looks like it was so easy, doesn’t it? Quite opposite of how much work it must of been. The path and beds are fantastic!
I’m in the middle of big projects right now, and I long for the completion stage…
Pam, you can’t imagine the layers of emotions I went through reading your post…at first glance, I thought omg, she did that herself – in this heat???? How on earth? Then I found you hired out the lawn removal – oh, relief for my shock, but I’m thinking ahead to the pea gravel…fortunately for my heart I learned you found someone to do that part also. I’m STILL impressed that you drove 18″ rebar into the hard clay/limestone earth twice for each step. It looks great!
The finished path looks great (and useful, too).
Amazing transformation and thanks for the details on the progress! Your plant selection is fabulous too.
I love, love, love it. Great job. I think the gravel will hold up fine.
What a terrific plan Pam ~ it came together beautifully and what a lot of work (even if you didn’t do it all yourself). What is the structure on the left side of the “after” photos that wasn’t there in the “before’s?” Count on us to notice every detail, right?!
That’s another project-in-the-works—a faux garden shed built around the pool pump ugliness. My DH, bless his heart, is building it for me. Progress will be slow this summer because he’s training for a fall Ironman in his spare time. —Pam
Love it Pam. Aren’t you glad to be rid of that grass? I have found that pea gravel does move a little bit with foot traffic but is easy just to smooth over again.
That looks great, Pam! But I’m sorry to hear the Cootamundra Wattle didn’t make it; their foliage is beautiful. Never heard of the replacement tree so I’m looking forward to seeing it flower.
I was bummed to lose the wattle too, but it wasn’t thriving, even before the big freeze. The Anacacho orchid tree (Bauhinia congesta) is native to central Texas. I grew it in my former garden; click on the link for a picture. —Pam
Pam, I’m impressed, as always, with how much of the work you did on your own. It looks fabulous! I’ve caught up on all your blog posts and am looking forward to seeing you in 2 weeks in Buffalo! Cooler temperatures … woo hoo!
Looks great Pam. I love how it curves down to your stock tank. I too am interested to see how it holds up with runoff. I have a couple of areas in my garden where I would like to do something similar (also very sloped),but I am worried about having a gusher of a rain storm. Pea gravel is probably a better option than crushed granite I’m thinking.
Pam, as always, looks great! I’m sure you’ll love the Anacacho Orchid tree! And what is this about free stones for the taking at Austin Memorial Cemetery? Do you know someone there or can someone just show up? After 4 years of digging I’m convinced there’s not a single rock in my yard (east Austin). People think I’m crazy because I got to Whittlesey and pay money for rocks!
Thanks, Ben. I already know and love the Anacacho orchid tree. I left a nice-sized one behind in my former garden, so I’m glad to be growing one again. And yep, rocks are free for the taking at Austin Memorial Cemetery. Just drive to the right as you enter; the road curves around to the left, and you’ll see open field with piles of rocks on your right. Anyone can help themselves. —Pam
Beautiful! I love the colors and textures together…really perfect.
That is one spectacular looking path. Very well done.
Hey Pam, the path looks great. I noticed you had a blue Eucalyptus to the side in an early shot but not in a later one. Is it not hardy there? I too was having trouble awhile back posting comments but I realized it didn’t like it when I used a URL to my blog that linked to a specific post. If I used the URL from the home page, everything was hunky-dory.
Thanks for the info about posting problems, Kelly. The tree was a purple-leaved acacia from Australia. It hadn’t thrived since I planted it, and the hard freezes over the winter did it in. I replaced it with a native Anacacho orchid tree (Bauhinia congesta). —Pam
WOW! I am so impressed. Your backyard slopes almost the same as mine and I’ve been struggling with what to do to my side yards for a long time. I am so inspired! Thanks.
I’m glad to have given you an idea for your side yards, Shell. Thanks for the comment! I’m going to be working on the other side of my sloping yard this winter, so I hope to have new pics in a few weeks. —Pam