

Make a cinderblock wall planter
A two-week frenzy of outdoor projects has accompanied the first stirrings of spring here in Austin. This weekend I completed a project I began in January: a succulent wall planter made of cinderblocks, inspired by a photo I saw at Apartment Therapy of a project created by Annette Gutierrez of Potted.
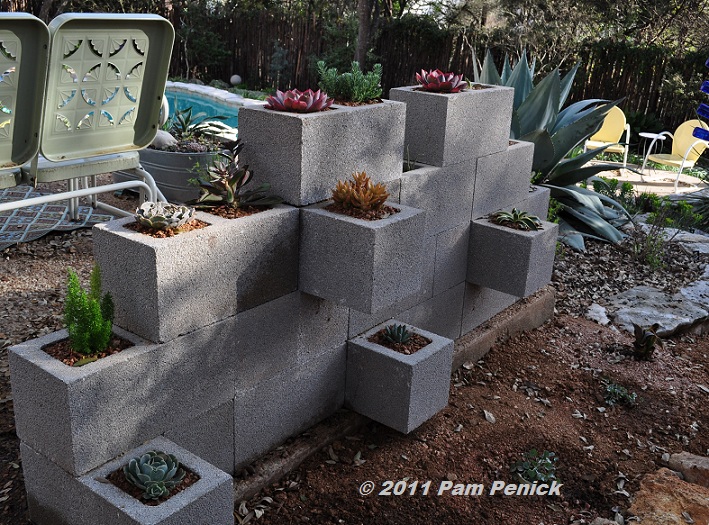
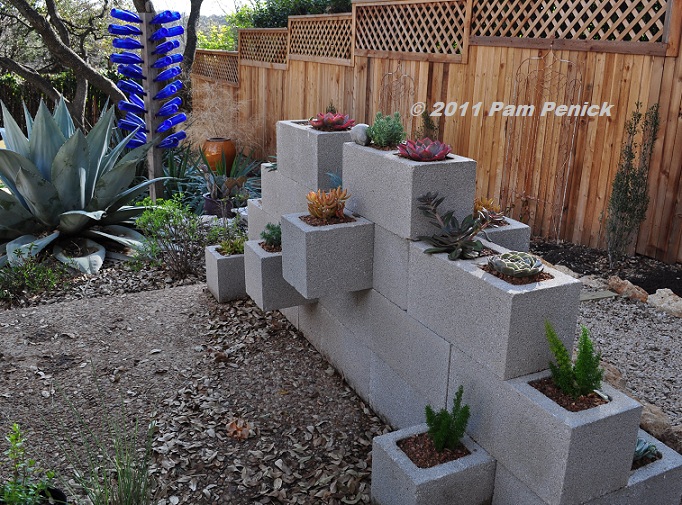
I am over the moon about this clever planter idea, in which the humble cinderblock is turned into a modern statement piece in the garden. I wish it were my brainchild, but I’m happy to copy great ideas when I spot them. For my own interpretation, I made it a two-sided wall, with planting pockets poking out on both sides.
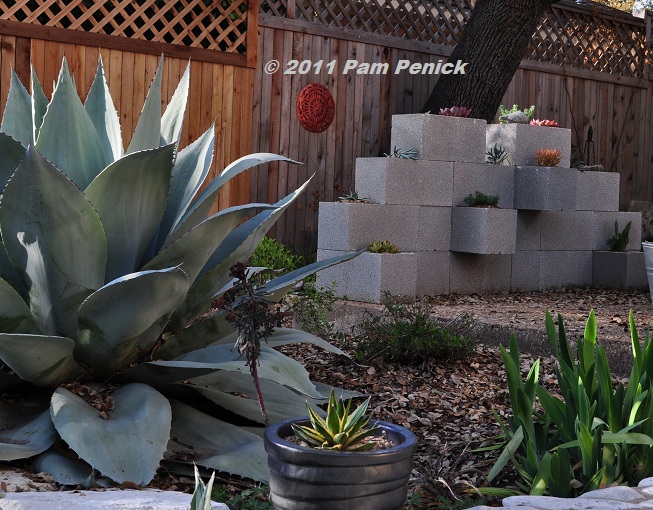
The wall anchors one edge of our upper patio. I’d fantasized for a while about giving the open patio a feeling of enclosure with a pergola. But a beautiful live oak hangs over the patio, creating a “ceiling,” and I found that the cinderblock wall and potted plants create a cozy feeling of enclosure, eliminating the need for an expensive pergola. String lights overhead also add ambiance and more “ceiling.” But I digress.
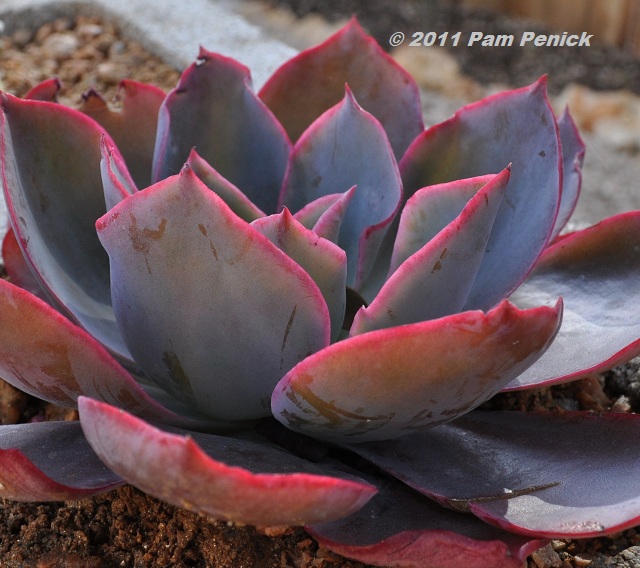
The wall could be planted with any type of small plant, but succulents are a natural fit since they love good drainage, have low water needs, and don’t mind growing in tight places. But let’s be real. If you grow succulents in central Texas you know they need protection from the sun in summer, and you accept that you’re going to lose some of them in winter freezes unless you bring them indoors. I’m treating most of the plants in my wall as annuals; if any survive the winter, it’ll be a welcome surprise. I’ll get at least 8, maybe even 10, months out of them before then.
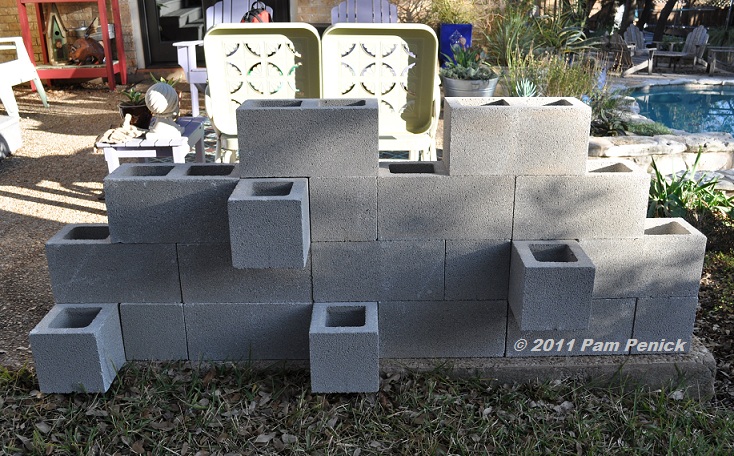
Do you want the nitty-gritty? First you decide on your layout. I experimented with various arrangements of the cinderblocks before settling on the current design. Be sure to stagger the blocks for added stability. My wall is fairly low, so I didn’t feel the need to use rebar or other reinforcing material, but I did use Liquid Nails to glue the blocks together. The weight of the top blocks keeps the cantilevered ones in place.
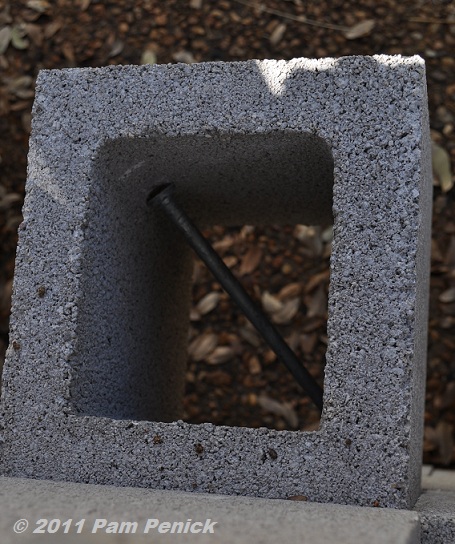
The tricky part is, of course, figuring out how to plant the open-bottomed, cantilevered blocks. Having read about Jenny Peterson’s solution of chicken wire and landscape fabric, I gave that a try. But my chicken-wire basket would not stay put, for some reason. So I bought 8-inch galvanized nails and jammed them into the open pockets, tapping them into place with the butt end of a hammer. Now I had something to rest my planting basket on.
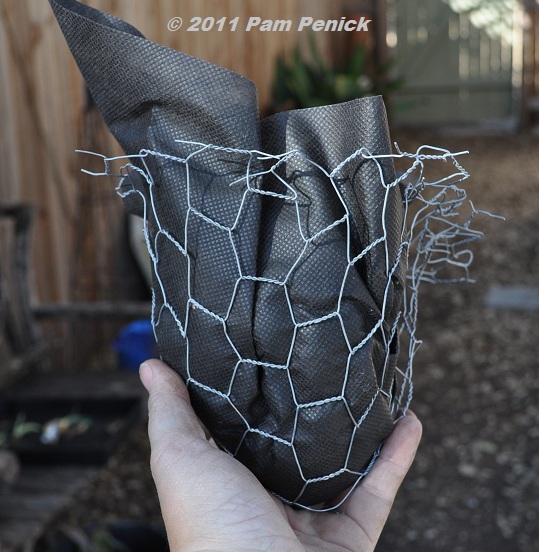
As Jenny suggested, I made planting baskets out of chicken wire lined with landscape fabric to hold the soil. Update: Use a tighter wire mesh, instead of chicken wire, for a better grip inside the cinderblock holes.
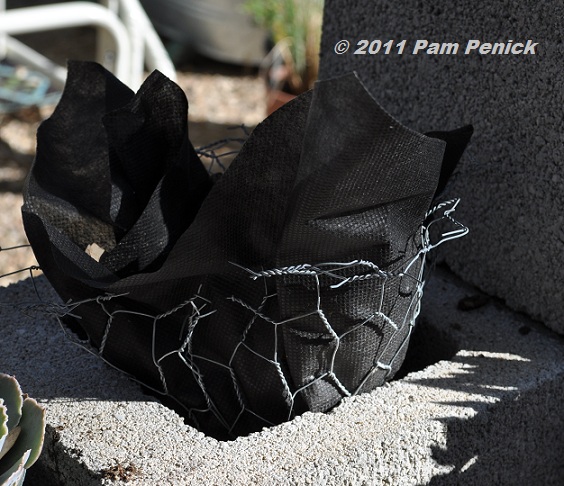
The baskets are then stuffed into the cinderblock holes. I folded and tucked the ends of the chicken wire and landscape fabric so that they wouldn’t show. Then I filled them with a fast-draining soil mix for succulents.
Planting time!
I love my new cinderblock wall planter and am enjoying it from many angles.
Disclaimer: Safety is your responsibility. When constructing a planter wall like this, especially if you plan to add height, be sure to follow standard wall-building practices: a solid footing, rebar supports, and mortar for walls of a certain height.
All material © 2006-2011 by Pam Penick for Digging. Unauthorized reproduction prohibited.
Great post, great project! I loved this planter wall idea when I saw it elsewhere as well, and filed it away for a rainy day – or ideal garden opportunity. So would you say it’s as easy as it looks?
I love reading about projects and works in progress, and this post fit the bill. Can’t wait to see what else has been getting tackled in your frenzy!
Thanks, Laura. It’s fairly easy, but it does take some time to assemble the planting baskets, and the cinderblocks need a good foundation. If you’re putting them on a patio, set-up is a cinch. But if you were putting them on soil, you’d have to make a solid foundation for them. —Pam
Very cool! I love it!
One of these would look groovy in your garden, Sheila. —Pam
Love it! It fits right in with your succulents and agaves!
Thanks, Lisa. I’m enjoying the punch of contemporary style in my more-traditionally styled garden. —Pam
It’s fantastic!
Thanks, Gail. —Pam
Pam, that is just brilliant! I may pilfer the idea for myself … I only steal from the best!
Pilfer away, Cindy. I did. This idea goes back at least to Apartment Therapy’s site from several years ago. —Pam
YOu know, I never would have thought cinderblocks could look good, no matter what, but you’ve totally proven me wrong! I think it looks absolutely great!
Thanks, Scott. I think the simplicity of form and color of cinderblocks goes really well with succulents. But I have a feeling that other small plants would work nicely too. —Pam
This is a great idea. And I’m happy to see it stuffed with succulents. That is what I am going to try.
Have fun with your version, Commonweeder. —Pam
Awesome. I’m going to try for something like this this spring too. It’s just not yet spring here….
I built my wall well before spring, Jim, and so could you unless you’re under snow cover. I just waited until spring to plant it. —Pam
Get out of freakin’ town! This is so cool Pam. I have been trying to figure out something to do with the stack of blocks that we have…might just try this on a smaller scale….THANKS!
Isn’t this a great project? I wish I could take credit for it, but I’m just playing with someone else’s bright idea. Have fun with it, Darla. —Pam
Hmmm, I love it!!! Gets me thinking that this might be a good idea instead of mosaic on the foundation along the patio maybe I could use a low version of this idea…would definitely be easier and would add some lushness from plants that the mosaic wouldn’t provide. Your wall looks great and is a wonderful source of inspiration! Way to go!
What a great idea, Cat. I look forward to seeing what you come up with. —Pam
I absolutely love this idea! I want to try it in our garden! Fantastic!!
Have fun with it, Meemsnyc. I look forward to seeing your version. —Pam
It really is beauty and the plants look so at home. I have been thinking where I could put one of these too! I’d like some advice on how to keep those succulents in rosette form. Mine tend to get very lanky. Any ideas?
You can cut the heads off, Jenny, and repot them without the leggy stalks. I have some lanky ones too right now. —Pam
That turned out really cool! It’s good that you have the patio surface as a foundation under it.
Yes, that made it a lot easier, Alison. —Pam
Nice job Pam!…I still haven’t decided where I could put on of these but someday I’ll figure it out!
Oh, I know you’ll find a spot, Loree! —Pam
LOVE it! I’m going to copy!!
Do! That’s what I did, and I’m happy to pass the idea along. —Pam
Excellent!!
Glad you liked it, Linda. —Pam
I like your project. I think it is very inventive. I can just see everyone scurrying around looking for the concrete blocks someone said they had to get rid of after a building project. It is great that you have a chance to have some survive. I look at all those lovely succulents and wish they would survive here.
And I often wish they would survive year-round here, Lisa. 🙂 Still, we have a nice, long growing season, and even as annuals they give a lot of bang for the buck. —Pam
What a wonderful idea. I love the look. I am glad you showed how you keep the soil in the opened end blocks. As I was reading down through the posting I was wondering, “now how did she keep that soil and plant in those ends”. LOL! It has loads of possibilities for plantings too. I could see cascading plants used in my cooler climate. Thanks for sharing this project.
Yes, there are cascading plants that could be used here too, Lona. So many possibilities indeed! —Pam
Wot a neat idea!
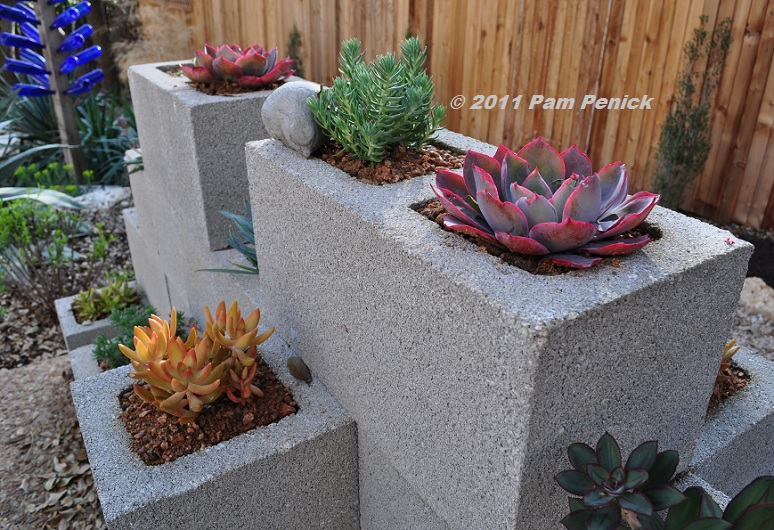
And I’m loving the colour of the plants against that grey too.
Best
R
Thanks, Robert. I’d originally thought to paint the wall, but I’m glad I didn’t. I like the gray too. —Pam
Wonderful! It looks great and so original! The plants are perfect.
Thanks, Cameron. I don’t know about original (since I copied this idea from someone else), but it’s a fun project worth making one’s own. —Pam
Way Cool! I may have to steal from you!
Do, Anne! Have fun with it. —Pam
Gorgeous. I love all those succulents. Your projects are inspirational.
Why, thanks, Layanee! You are kind to say so. —Pam
such a wonderful idea wish i would of seen this when i still lived in oregon nice job
Perhaps you can adapt it for the region you live in today, Gloria? I bet Oregon was a gardener’s paradise though, huh? —Pam
You are so very clever!
I’m a good tweaker of other people’s clever ideas, Les. 😉 —Pam
I love this. My last experience with these blocks was book shelves in college. You are a genius and an artist.
Thanks, Patsy, but I just borrowed this idea from another. Isn’t it great to be able to share these projects online? —Pam
Hey Pam! I love your version–what a great way to separate a space by making it two-sided! The reason (I think) that your chicken wire didn’t stay put initially is that it’s not sturdy enough. I had originally suggested using chicken wire, when my foreman/BF Brett said we didn’t use chicken wire, we used metal lathe. Hey, it looked like chicken wire to me! Sorry for the confusion–I’d made a correction in the comments section of that post awhile back. Anyway–beautiful work! Can’t wait to see it in person!
Aha! You used metal lathe? I wondered why your chicken wire didn’t look like mine. 🙂 Thanks again for the tip on making the planting baskets. —Pam
Very cool. I have lots of sedums that do fine in North Texas, so I know they would be fine by you. They would spill over the edges of the blocks, too, softening it. Great job. I know it feels so good to finally accomplish a goal 🙂
It does indeed, Toni. On to the next project! —Pam
Wow Pam this idea is incredible! I never would have thought of it! I may try a variation myself. But I don’t have a nice tree like you have as some shade. That can be a big problem at my house. It gets terribly hot here in the summer. Even some of my cactus burn. It’s kind of crazy. But I will think of something! Great post!
Good luck with your own design, Candy. I bet it’ll turn out great with some small, xeric, heat-loving plants. —Pam
I love this! It’s brilliant: cheap, sleek and do-able. I think I’d need to find other plants, though. We only get about six to eight months a year from our sedums in Portland. Thanks, Pam!
In Portland I’m sure you’ll have a million options for planting, without the worry about them getting too dried out. Have fun with it! —Pam
Hi Pam!
I love this project…gorgeous! What also caught my eye is the blue bottles in the background. That is so pretty! 🙂
Thanks, Nicky. Putting up the bottle tree was one of the first things I did in my new garden. —Pam
Wow, Pam, I love this! So ingenious!
That’s what I thought when I first saw this idea on another site. I just had to try it too. —Pam
Oooh, I REALLY like that. Now how could I incorporate that into a school garden…or my garden???. Thanks Pam for showing a cool idea.
My pleasure, Bonnie. Have fun with it! —Pam
This idea was made for your garden Pam. It turned out great and what a perfect way to view each gorgeous specimen.
Thanks, Kathleen. The blocks really do frame each succulent nicely. —Pam
Now you’ve done it….another project that I can’t wait to try. I think even a scaled-down version would be great in smaller spaces. I love how the ‘industrial’ gray compliments the steel stock tank planters and pond (also on my wish list).
Me too, Katzien! The industrial, workmanlike colors do work well together. —Pam
Wow! I love it. What a wonderful addition to your garden. Thanks for sharing the great pics and how-to info. 🙂
My pleasure, Hilary. —Pam
There is so much design potential for this concept… I love what you have created. I’m imagining an entire wall, filled with whatever will grow in an area. Very cool. Fencing will never be the same again!
Thanks, Sheila. I’m glad you like my wall, though I can’t take credit for the original idea. But yes, it seems adaptable to a wide variety of conditions. —Pam
OMW, it looks fantastic Pam. I just may have to borrow the idea. I know just where I can put it too. Thanks.
Have fun with it, Lola! —Pam
I love this idea. I popped over from Darla’s. I had to look at yours too after seeing what she did. I love the succulents that you used.
Thanks for visiting, Becca. The succulents are great for a dappled shade spot in my climate. Very low-maintenance. —Pam
I LOVE THIS!!! I once did a wall doubled up with these blocks…and just added soil…and marigold seed…it was a little divide in the parking area out back…I added solar lights and everything…then one night some teenagers stole my blocks and used them to smash windows of parked cars on the street behind ours…and destroyed my solar lights…I felt soooo bad! It wasn’t my fault…so the next year I planted it again…and someone sabotaged me…with dill seeds…which…I didn’t mind…I love dill!
I wonder if the new people who bought my old house still have it there!
Bummer about the vandalism, Tootsie, but your wall idea sounds like fun. Thanks for stopping by. —Pam
I am happy to have found you…I am your newest follower! you are in my blog list of places I like to haunt! please join in my Friday flower flaunt weekly party. I put the linky post up usually on Thursday evening!
So everything comes full circle. That was the wall I built in Apartment Therapy and I am so honored and excited to see it done so well on your blog. It keeps turning up again and again. We used Liquid Nails to hold cut out pieces of concrete backer board to fill the bottoms. The wall is still going strong at my client’s house.
Annette! How wonderful to hear from the woman who came up with this creative idea! Your wall that was featured on Apartment Therapy was so inspirational. I bookmarked it, and I know of many others who did also. I love seeing simple materials used in such creative ways. Thanks for dropping by! —Pam