

How to lay a flagstone patio for outdoor living space
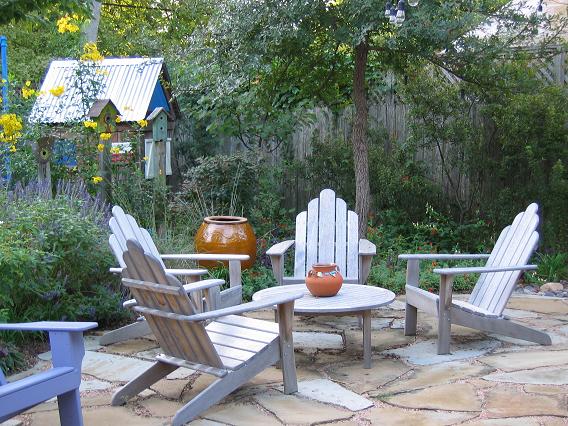
Stone patio, October 2006
I wasn’t yet blogging in 2003, when I dry-laid a small, stone patio in the back garden. So when South Carolina Pam asked me about its construction, after its appearance in my last post, I decided to write a belated “how I did it”—for anyone else who desires a margarita-sipping spot in their garden.
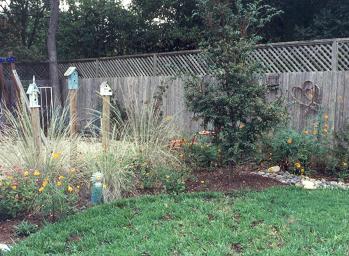
It’s hard for me to remember that this is how my young garden looked pre-patio: a small lawn bordered by native grasses, tiny perennials, and fill-in orange cosmos, with a brand-new cedar elm stuck in the dirt. Behind that, you can glimpse the pea-gravel area that contained a playset for the kids (since converted to a smaller, mulched play space).
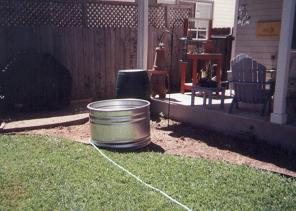
On the other side of the lawn that would shortly become a patio, I was digging out another bed and positioning a galvanized stock tank that I planned to use as a container pond. The open back porch had not yet been screened by my handy husband.
The lawn—scraggly and prone to fungus—wasn’t an asset. I wanted a pleasant sitting area for enjoying the garden, so I decided to install a patio in its place. That winter, my husband and I dug out the sod to a depth of about 4 inches. [Update: A deeper foundation is better, and today I suggest digging out to a depth of 6-8 inches, then spreading 4 inches of crushed gravel or paver base and compacting it.] As necessary, I adjusted the steel edging that had surrounded the lawn; it would provide the containing edge around the new patio. I ordered a few cubic yards of coarse builder’s sand and spread it over the bare dirt about 2 inches thick. A visit to Daniel Stone, one of my favorite stoneyards, turned up a lovely, brown-and-gray flagstone called Oklahoma patio stone that suited my budget, and I ordered two pallets in a 2- to 3-inch thickness. (Thinner stone, I was advised, can shift in an unmortared patio.)
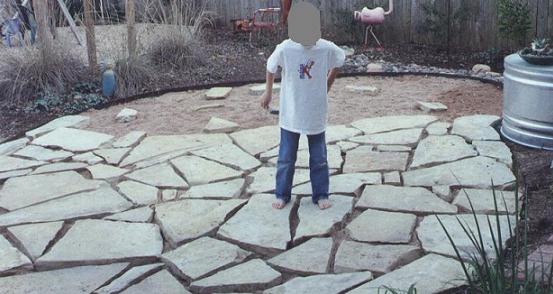
Austin’s mild winters are the perfect time for do-it-yourself hard-labor projects—at least for people like me, who hate to sweat. This was definitely a hard-labor project, albeit do-able and satisfying. By January 2003, I was hauling the heavy slabs, one by one via a wheelbarrow, and fitting them closely together on top of the builder’s sand.
I made sure the stones were flush with the top of the steel edging so I wouldn’t have a tripping hazard later on. On hands and knees, I used a level to check each stone as I placed it. Not every slab was exactly the same thickness, so I added sand and scooped it away as necessary to level the stones as I went along. I followed the slight slope of my yard so that water would run off the patio rather than pooling on it. Also, I mixed up the larger slabs with the smaller, filler pieces; I didn’t want to use up all the big stones at the start of the project, only to be left with a bunch of filler pieces when finishing the far side.
When the last stones were pieced in against the edging on the far side, I bought bags of decomposed granite to use as grout. I’d read that decomposed granite would keep ants out better than sand. Using a push broom I swept the crushed granite into the cracks, then used a hose to wet it down. As the granite settled, I added more until the “grout” was level with the stone.
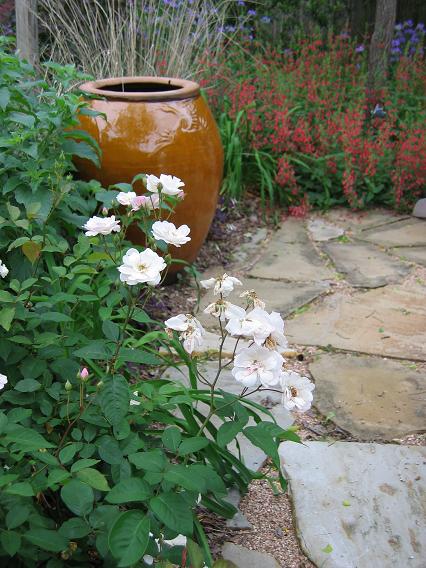
At last, it was time for the Big Reveal. Directing a hard stream of water from the hose, I carefully sprayed each stone to wash away the white dust and orange, decomposed-granite mud, revealing the beautiful browns and grays of the patio stone. My new garden room was finished.
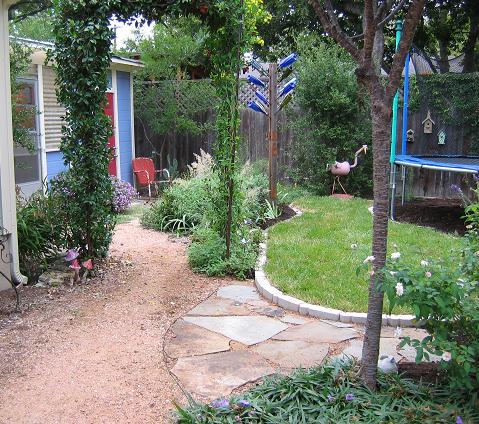
Postscript—Last fall, I added a stone “apron” that leads to the rear of the back garden. I constructed it the same way as the patio, using the same Oklahoma patio stone.
All material © 2006-2012 by Pam Penick for Digging. Unauthorized reproduction prohibited.
That looks “easy enough”, so to speak. I’ll say to you what others say to me when they see something in my garden that they would like to copy, “when can you be over to help?” I’ll supply all the materials, and I won’t just watch, I’d work right beside you, carrying my share of the load. Last year, I got an estimate to expand my brick patio… $9,000! Think how much you saved doing this yourself.
Carol at May Dreams Gardens (where I didn’t pay no $9,000 for a brick patio expansion!)
I’ll be there in spirit, Carol. 😉 Yes, I know the patio would have cost some thousands of dollars had we hired someone to do it for us. Some things are worth it, but I knew I could do this project myself. And so can you, so good luck with your brick patio! —Pam
I love the patio – it’s clearly a labor of love and you did a beautiful job. I have some Oklahoma stone in my pathway with crushed granite and river rock and I love it! You can check it out at my website. Enjoy your margaritas!
Thanks, Diana, and I’ll check out your pathway sometime. —Pam
You did a great job with that DIY project. I think those kinds of projects bring the most satisfaction, especially when we think about the money we saved. It looks like a great spot to sit and have iced tea while the kids are out playing.
Yep, the satisfaction of doing it oneself often trumps the backache. My patio is indeed a good spot to sit and have a drink, but unfortunately not at this time of year. Too many mosquitoes, and usually too hot. But in the late fall, winter, and spring, it’s nice. —Pam
Pam, the patio looks wonderful in real life – I really enjoyed reading the story of how you built it.
Annie at the Transplantable Rose
Thanks, Annie. During our blogger get-togethers, we’ve always sat on the screened porch. One of these days I’ll lure our group out onto the patio. —Pam
Pam, I love this story too! Your step-by-step instructions would have really helped me 15 years ago when I attempted a similar project. I had no cash, only cast-off flagstones (and not quite enough) and no sand, but I like the finished product though it’s uneven and bumpy. (Level, should have used level)!
Your before pictures are unrecognizable, and you sure do have a great margarita-sipping spot! And is that a pink flamingo I spot behind the bottle tree? Love it!
Why, yes, that IS a flamingo, Lost Roses. Like you and Elizabeth, I happen to have that emblem of good taste in my garden as well, although mine is a scrap-metal variety. A fun gift from my mom, it migrates around the rear garden and currently inhabits a thicket of yaupon hollies near the kids’ playhouse. 😉 —Pam
A great looking project. I am contemplating a walkway around the house constructed with fieldstones so thanks for the information. You didn’t mention if you used gardener’s cloth to prevent weeds. Do you have weeds sprouting between the fieldstones? One of our friends found a source of free used bricks and created a backdoor entry with them but neglected to use the cloth. She had weeds galore between every brick. These weeds were really tough to pull out. I know because I tried to remove a few but gave up because they were so entrenched.
That’s a good question, Ki. I don’t think I used a weedblock fabric on this project. I don’t actually get a lot of weeds between the patio stones, and the few that do pop up are pretty easy to pull. Ironically, however, on my decomposed-granite paths, where I did install weedblock, I regularly battle entrenched weedy grasses and wild purslane, which happily grow in the top couple of inches of the granite. So I’ve learned that using weedblock isn’t necessarily going to prevent weeds, at least not in granite paths. —Pam
Seeing other gardeners’ projects turn out well is always inspiring to those of us who struggle. I love your step-by-step description. It turned out great. Your attention to process and detail certainly show–especially in getting the drainage right and the top of the stones level.
Thanks, MSS. It isn’t perfect, but I’ve been pleased with the result. I’m glad you enjoyed this post. I always like to know how people tackle projects like this too. —Pam
Please consider your self invited to come ply your trade on my cobblestone path any ol’ time you want Pam!
If it would score me a trip to San Francisco, I might just do it. 😉 —Pam
Well, it looks like I’ll have to get in line for your patio services!! Thanks so much for posting this – it is much appreciated. I printed out this post and stuck it in my ‘things I want to get around to book’ – so hopefully when things settle down I’ll give it a try. It really is such a nice patio (but then your garden is so beautiful, I’m sure any patio would look great).
You’re welcome, Pam. I hope it helps when you’re ready to make your own patio. —Pam
Thanks for sharing this. I’m getting ready to do a similar project. I’m redoing a walkway because the stones I used are not flat and it is uncomfortable to walk on. I’m going to get flat rocks this time and do it over again. Every time I attempt something like this, it never comes out level! 🙁
Mine isn’t perfectly flat either, but as you note, the flatter the stones the better. Try it with the sand base and the level, Phillip, and I bet you’ll get a good result. —Pam
i.am.drooling….but I do that with all of your posts… this is such a lovely spot.. and a great place for margs. I love the round space. See ya soon.
Thanks, Diana! —Pam
well…I’m afraid you’ve done it…I’m going to share your terrace photos with Mr G and ‘splain this is what I’ve been dreaming about…in several spots about the place 🙂
Oh-oh. You’ve got some ‘splaining to do! Seriously, I’m glad you like the patio. Have fun making one of your own. —Pam
i am having a patio installed right now with flagstone and crushed granite. will the granite be constantly tracked into our house and pool? how do you get it to stay in place? can it be sealed somehow?
thanks
Probably. Granite does occasionally stick to my feet when I walk on my patio, although the flagstones are large and I usually stay on them. We don’t track it in the house very often because I have doormats in front of the porch door and the back door. I don’t know if it can be sealed. You might be better off mortaring your patio since it’s by your pool. —Pam
Just beautiful! We are in the process of designing a patio for our backyard. We need one big enough to a place to put 4 Adirondacks and a portable firepit in the middle with a space for a portable grill and small table to hold items while grilling. We are thinking about an 18′ diameter patio. What size is yours? It looked large in your construction photo but much smaller in the after photo with the patio furniture?
It’s an oval shape, about 20′ long and 15′ wide. I think you’ll need a larger patio to accommodate your grill, but everything else should fit. Thanks for visiting, Janice. —Pam
….I was told that polymetric sand is great for spreading between the pavers, stones or bricks. It has glue in it so it sets up hard and won’t let weeds grow in it.
I’ve heard about that too, Stephanie. Thanks for pointing it out. —Pam
I am researching on how to install a flagstone patio like yours. I want to plant petite herbs or forbs in between the pavers. Would you suggest using soil on top of the crushed granite or instead of the granite? Also, I read you used a steel edging. Did you remove the edging after the installation? Thanks Pam, I’m glad I found your blog. -Kimmi Rockport, TX
Kimmi, if I were planting between the stones I’d probably use a gritty soil mix rather than decomposed granite, which is hard to plant in, though certain rock garden plants will self-seed in it readily. As for the steel edging, that remained to hold the stones in place. I was careful to make sure the top of the stones was level with the top of the steel edging to avoid a tripping hazard. —Pam
Thanks for the inspiration. Your work is lovely and if I was in the area I’d come to visit! Can’t wait to do something creative in my garden this weekend here in Carlsbad, California!